These series of article record my learning process of Django Web Development
Introduction to Django
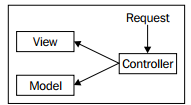
Django loosely follows a model-viewcontroller design pattern,which greatly helps in building clean and maintainable web applications
MVC pattern in Web Development
A few years ago, the model-view-controller pattern came for web-based applications was introduced. This software engineering pattern separates data (model), user interface (view), and data handling logic (controller), so that one can be changed without affecting the others.
advantages of Django
The standard features expected of a web framework are all available in Django, which include:
- supporting MVC
- A template and text filtering engine with simple but extensible syntax.
- A form generation and validation API.
- An extensible authentication system.
- A caching system for speeding up the performance of applications.
- A feed framework for generating RSS feeds.
Apart from those above features, Django also have the following advantages:
Tight Integration between Components
First of all, Django provides a set of tightly integrated components; all of these components have been developed by the Django team themselves. Django was originally developed as an in-house framework for managing a series of news-oriented websites. Later its code was released on the Internet and the Django team continued its development using the Open Source model. Because of its roots, Django’s components were designed for integration, reusability and speed from the start.
Object-Relational Mapper
Django’s database component, the Object-Relational Mapper (ORM), provides a bridge between the data model and the database engine. It supports a large set of database systems, and switching from one engine to another is a matter of changing a configuration file. This gives the developer great flexibility if a decision is made to change from one database engine to another.
Clean URL Design
The URL system in Django is very flexible and powerful; it lets you define patterns for the URLs in your application, and define Python functions to handle each pattern. This enables developers to create URLs that are both user and search engine friendly.
Automatic Administration Interface
Django comes with an administration interface that is ready to be used. This interface makes the management of your application’s data a breeze. It is also highly flexible and customizable.
Advanced Development Environment
In addition, Django provides a very nice development environment. It comes with a lightweight web server for development and testing. When the debugging mode is enabled, Django provides very thorough and detailed error messages with a lot of debugging information. All of this makes isolating and fixing bugs very easy.
Multi-Lingual Support
Django supports multi-lingual websites through its built-in internationalization system. This can be very valuable for those working on websites with more than one language. The system makes translating the interface a very simple task
start a new Django Project
open a terminal (or command prompt for Windows users), type the following command, and hit enter:django-admin.py startproject new_project
This command will make a folder named django_bookmarksin the current directory, and create the initial directory structure inside it. Let’s see what kinds of files are created:
new_project/
    __init__.py
    manage.py
    setting.py
    urls.py
The explanation of the four main files are :
init.py Django projects are Python packages, and this file is required to tell
Python that the folder is to be treated as a package. A package in Python’s terminology is a collection of modules, and they are used to group similar files together and prevent naming conflicts.manage.py This is another utility script used to manage your project. You can think of it as your project’s version of django-admin.py. Actually, both django-admin.pyand manage.pyshare the same back-end code. manage.py is used to control the demand of Django.
settings.py This is the main configuration file for your Django project. In this file you can specify a variety of options, including the database settings, site languages, which Django features are to be enabled, and so on. Various sections of this file will be explained as we build our application during the next chapters, but in this chapter, we will only see how to enter the database settings.
url.py This is another configuration file. You can think of it as a mapping between URLs and Python functions that handle them. This file is one of Django’s powerful features, and we will see how to utilize it in the next chapter.
When we start writing code for our application, we will create new files inside the project’s folder. So the folder also serves as a container for our code.
In the following case, I try to use the soical bookmark to illustrate how to ceate a simple webapp from scratch. This include the setup of database(qulite3), setup MVC framework, establishment of Registration, tag Voting,Commenting functions, be familar with the User Interface with Ajax, the setup of Administration Interface, searching, user network and finally Deploying the web app.
setup the database
open the settings.py file, we can see that the following information for the setup of database:
1 | DEBUG = True |
Here we use the sqlite3 as the default database to implement the app. So it is simple to just setup the “ENGINE” and “NAME” :
1 |
|
To create the database and initialize the tables in the database, we can use the following command:$ python manage.py syncdb
Note: there maybe an error **No module named 'sqlite3.base'**
Launching the Development Server
Launching the Development Server
As discussed before, Django comes with a lightweight web server for developing and testing applications. This server is pre-configured to work with Django, and more importantly, it restarts whenever you modify the code.
To start the server, run the following command:$ python manage.py runserver
according to the instruction of the server, we can open the browser to see our web app.
build the basic web application
In this part, I am intended to learn MVC framework and templates. First of all, we need to create our own main page(index)
URLs and Views: Creating the Main Page
To create our own welcome page, we need to define an entry point to our application in the form of a URL (URL), and tell Django to call a particular Python function when a visitor accesses this URL. (VIEW)
VIEW
A view in Django terminology is a regular Python function that responds to a page request by generating the corresponding page. To write the main page (any functions of Django), we we first need to create a Django application inside our project.
To create it, issue the following command within our folder:
$ python manage.py startapp bookmarks
After running this command, Django will create a folder named bookmarksinside the project folder with these three files:
- init.py: This file tells Python that bookmarksis a Python package.
- views.py: This file will contain our views.
- models.py: This file will contain our data models.
Open the file bookmarks/views.pyin your code editor and enter the following:
1 |
|
- We import the class HttpResponsefrom django.http. We need this class in order to generate our response page.
- We define a Python function that takes one parameter named request; this parameter contains user input and other information. For example, request. GET, request.POSTand request.COOKIESare dictionaries that contain get, post and cookie data respectively.
- We build the HTML code of the response page, wrap it within an HttpResponseobject and return it.
relation about request and response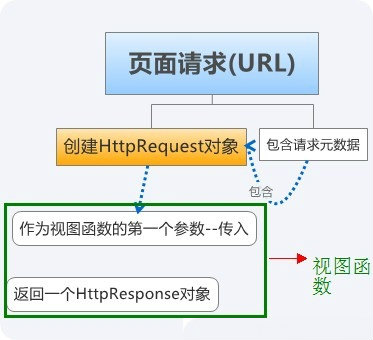
httprequest 表示来自某客户端的一个单独的HTTP请求。HttpRequest对象是Django自动创建的。
URL
As you may recall from the previous chapter, a file named urls.pywas created when we started our project. This file contains valid URLs for our application, and maps each URL to a view that is a Python function.
As you can probably tell, the file contains a table of URLs and their corresponding Python functions (or views). The table is called urlpatterns, and it initially contains example entries that are commented out. Each entry is a Python tuple that consists of a URL and its view.
The Django use URL to allocate each url address to each view and do different tasks.
Let’s start by removing the comments and adding an entry for the main page:1
2
3
4
5from django.conf.urls import patterns, include, url
from bookmarks.views import *
urlpatterns = patterns('',
(r'^$', main_page),
)
- The file imports patterns, include, url from the module django.conf.urls. This module provides the necessary * functions to define URLs.
- We import everything from bookmarks.views. This is necessary to access our views, and connect them to URLs.
The patterns function is used to define the URL table. It contains only one mapping for now — from r’^$’to our view main_page.
the synax in URL expression need some knowledge from regix. For more detail, please see the documentation online at: http://docs.python.org/lib/module-re.html
| Symbol / Expression | Matched String |
|---|---|
| . (Dot) | Any character. |
| ^ (Caret) | Start of string. |
| $ | End of string. |
| * | 0 or more repetitions. |
| + | 1 or more repetitions. |
| ? | 0 or 1 repetitions. |
| A \ B | means A or B. |
| [a-z] | Any lowercase character. |
| \w | Any alphanumeric character or _. |
| \d | Any digit. |
the Database and Models
If you are used to dealing with the database directly through SQL queries, then you may find Django’s approach to database access a bit different. Loosely speaking, Django abstracts access to database tables through Python classes. To store, manipulate and retrieve objects from the database, the developer uses a Python-based
API. In order to do this, SQL knowledge is useful but not required.
This technique is best explained by example. For our bookmarking application, we need to store three types of data in the database:
- Users (ID, username, password, email)
- Links (ID, URL)
- Bookmarks (ID, title, user_id, link_id)
Each user will have their own entry in the Users table. This entry stores the username, password and email. Similarly, each link will have a corresponding entry in the links table. We will only store the link’s URL for now.
As for the Bookmarks table, you can think of it as the joining table between Users and Links. When a user adds a bookmark, an entry for the bookmark’s URL is added to the links table if it doesn’t already exist, and then a joining entry is added to the Bookmarks table. This entry connects the user with the link, and stores the title that the user entered for their bookmark.
To use and define the model, we first need to activate it in our Django project. This is done by
editing settings.py, looking for the INSTALLED_APPSvariable, and adding our
application name (django_bookmarks.bookmarks) to it:
1 | INSTALLED_APPS = ( |
For all three database:
Link Data Model
1 | from django.db import models |
User Data Model
from django.contrib.auth.models import User
use the default user model in django
Bookmark Data Model
1 | from django.contrib.auth.models import User |
**many to many relation**

A bookmark belongs to one user and one link. However, one user may have many bookmarks, and one link may be
bookmarked by many users. In database language we say there is a many-to-many relationship between users and links. However, there is no way to actually represent a many-to-many relationship such as this one using a standard database system. In our particular case, we will invent the concept of a bookmark to break up this
many-to-many relationship into its constituent one-to-many relationships.

The first of these is the one-to-many relationship between the user and their bookmarks. One user can have many bookmarks, but each bookmark is associated with only one user. That is to say, each user can bookmark a particular link once.

The second of these is the one-to-many relationship between a link and its bookmarks. One link can have many bookmarks associated with it if multiple users have bookmarked it, but each bookmark is associated with only one link.
as we set up the Model.py and then, run the following command manage.py syncdb in order to create its corresponding table.
Let’s examine the SQL query generated by Django to see how it automatically
handles foreign keys. Again, issue the following command:
$ python manage.py sql bookmarks
And the result is :
1 | BEGIN; |
Now that the data models are ready, we have the facilities to store and manage our data. Django offers an elegant and straightforward Python API to store Python objects in the database, thus sparing the developer the burden of working with SQL and converting between SQL and Python types and idioms.
Template
The next thing we need concern is the templates. It is a very important part in Django and all web app for python. Because handling the html code directly in python may have many disadvantages:
- Good software engineering practices always emphasize the separation between UI and business logic, because it enhances reusability. However, embedding HTML within Python code clearly violates this rule.
- Editing HTML embedded within Python requires Python knowledge, but this is impractical for many development teams whose web designers do not know Python.
- Handling HTML code within Python code is a tedious and error-prone task. For example, quotation marks in HTML may need to be escaped in Python string literals, and the overall result may be unclean and unreadable code.
some synax for the templates
Checking whether a variable is empty or not in a template is done using the following syntax:
1 | {% if variable %} |
This ‘if’ condition works as expected. If the variable contains data, only the first line is printed to the browser. On the other hand, if the variable is indeed empty, only the second line is printed.
To iterate through a list and print its items, we use the following syntax:
1 | {% for item in list %} |
Finally, if a variable has attributes, you can access them in a way similar to Python:
Combining Templates and View
If we want tansfer some variable or character from URL to the web server (eg: into View), how do we do it? For example, an URL of a User page will have such form : user/username,where usernameis the owner of the bookmarks that we want to see.where usernameis the owner of the bookmarks that we want to see.
1 | urlpatterns = patterns('', |
We have surrounded this portion of the regular expression with parentheses; this will cause Django to capture the string that matches this portion, and pass it to the view, as we will see later.
and we modify the View.py for user_page
1 | from django.http import HttpResponse, Http404 |
There are several features need to be mentioned here:
- Unlike our first view, user_pagetakes an extra parameter in addition to the familiar request object. Remember that the pattern for this URL contains capturing parentheses? Strings captured by URL patterns are passed as parameters to views. The captured string in this URL is passed as the username parameter.
- We used User.objects.get to obtain the user object whose username is requested. We can use a similar technique to query any table by a unique column. This method throws an exception if there are no records that match the query, or if the matched record is not unique. The reason we can use User.objects.get is that we directly use default User Model to define our database table
- If the requested username is not available in the database, we generate a 404 “Page Not Found” error by raising an exception of the type Http404.
- To obtain the list of bookmarks for a particular user object, we can conveniently use the bookmark_set
bookmarks = user.bookmark_set.all()attribute available in the user object. Django detects relations between data models and automatically generates such attributes. There is no need to worry about constructing SQL JOIN queries ourselves to obtain user bookmarks for example. See more detail in stack overflow user-object-has-no-attribute-bookmark-set, And Django reference under “Following relationships “backward””
User Registration and Management
- Creating a login page.
- Enabling logout functionality.
- Creating a registration form.
- Enabling users to update their account information.
Django has its own Authentication module. The Django authentication system is available in the django.contrib.
authpackage. It is installed by default as part of Django, and projects created with
the django-admin.pyutility have it enabled by default.
Before we start using the authentication system, let’s have a quick look at the features
that it provides:
- Users: A comprehensive User data model with fields commonly required by web applications.
- Permissions: Yes/No flags that indicate whether a user may access a certain feature or not.
- Groups: A data model for grouping more than one user together and applying the same set of permissions to them.
- Messages: Provides the functionality for displaying information and error messages to the user.
Creating the Login Page
Open the file in your editor and change it so that the URL table looks like the following snippet:
1 | urlpatterns = patterns('', |
The login view requires the availability of a template called registration/login.
html. It loads this template and passes an object that represents the login form to
it. We will learn about form objects in detail when we create a user registration
form, but for now, we only need to know that this object is called formand has the
following attributes: form.username, form.passwordand form.has_errors. When
printed, the first two attributes generate HTML code for the username and password
text fields, whereas form.has_errorsis a Boolean attribute that is set to true if
logging-in fails after submitting the form.
Improving Template Structure
We see lots of templates have similar structure. Wouldn’t it be great if we could factor out the shared sections into a single file so that, if we want to modify all the pages in future, we need only edit one file?
Fortunately, the Django template system already provides such a feature-template inheritance. The idea is simple; we create a base template that contains the structure shared by all templates in the system. We also declare certain blocksof the base template to be modifiable by child templates. Next, we create a template that
extendsthe base template and modifies its blocks. The idea is very similar to class inheritance in object-oriented programming.
the base file:1
2
3
4
5
6
7
8
9
10
11<!DOCTYPE html PUBLIC "-//W3C//DTD XHTML 1.0 Transitional//EN"
"http://www.w3.org/TR/xhtml1/DTD/xhtml1-transitional.dtd">
<html>
<head>
<title>Django Bookmarks | {% block title %}{% endblock %}</title>
</head>
<body>
<h1>{% block head %}{% endblock %}</h1>
{% block content %}{% endblock %}
</body>
</html>
The template utilizes a new template tag called block. This tag is used to define sections that are modifiable by child templates. Our base template contains three blocks, one for the title, one for the page heading and one for the body.
To be continued
how to apply crob job to do some thing